Wordscapes with OpenCV
2022-10-04I don't play a lot of games, but occasionally one catches my eye, usually because it looks like something I could have fun automating.
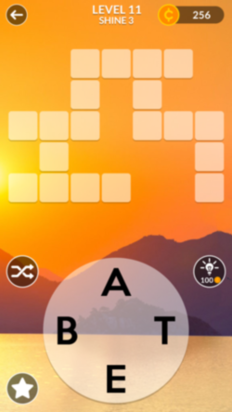
This time, the game was Wordscapes, a cross between scrabble and a crossword. The aim is to find the words in the grid using a given set of letters; each letter can only be used once, bonus points for extra words!

The mechanics of the game are trivial to automate, we just need to find all words that are only made up of the letters we have available. I'll spare you the details, we're just programmatically searching through a dictionary for matching words; let's get to the good bit.
Parsing the Game Screen
The interesting parts of this problem revolve around interacting with the game. The game is designed for humans, not computers, so we'll have to do some computer vision work to extract the required information; OpenCV is ideal for this.
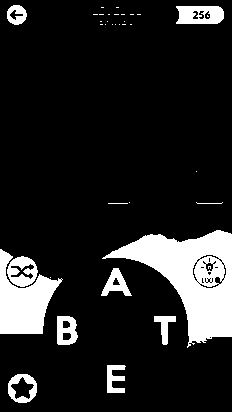
The first step of the process is isolating the wheel. Firstly we convert the image to greyscale (colour information isn't important to us) and then threshold it to give us a purely black and white representation. We also normalise the image to always have a black background with white letters (sometimes the wheel is white with black letters).

We can now easily mask out the remainder of the image as the wheel is always in the same position. To achieve this, all we need to do is bitwise AND a white circle over the letter wheel to leave us with just the letters.

Our final computer vision step is to isolate the individual characters and as we're creating a generic solution that should work on any level with any number of characters, we can't use absolute coordinates to do this, we need to do it dynamically.
The OpenCV findContours function provides us with a way to do this.
Contours can be explained simply as a curve joining all the continuous points (along the boundary), having same color or intensity. The contours are a useful tool for shape analysis and object detection and recognition. OpenCV
So, using findContours followed by boundingRect leaves us with each letter
nicely isolated.

OCR - Optical Character Recognition
Optical character recognition [...] (OCR) is the electronic or mechanical conversion of images of typed, handwritten or printed text into machine-encoded text Wikipedia
Now we've extracted each character, we just need to identify which characters they are. We could use machine learning to do this, but there's a simpler way for us to achieve the same result.
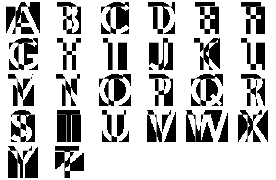
If we store a copy of each letter in a library (manually labeling it the first time we see it) and simply XOR it with the letter we're wanting to identify, we'll be left with a diff of the two images. The result with the least difference is our letter.
Let's run through a quick example. Take the letter "T" (currently unidentified), and XOR it with with each letter in our library:

It's quite clear that when our unidentified letter is XORed with our library's "T", comparatively few pixels differ. Here's that same data represented as a graph, it's easy to see here that the letter "T" is the closest match:
Game Interaction
We've identified our letters and we've searched through a dictionary for valid words, all we have to do is swipe them in and we're done!
Given that we already know the position of the letters on the screen thanks to
the boundingRect function, we just need a way to actually send the swipe
commands. Thankfully Google provides us with a tool called Android Debug
Bridge (adb for short) that allows us to interact with our device from a
connected computer.
Using the adb shell command allows us to execute commands on the device, pair
this with the input command and we're able to send a single swipe. If we
wanted to bring up our app drawer from the home screen, for example, we could do
something like this: adb shell input swipe 100 1000 100 100.
Unfortunately, that's as far as this command can take us. As I mentioned above,
the input command only allows us to send a single swipe, rather than the
multiple continuous swipes that are needed to spell out our word.
The sendevent Command
Let's go one level lower, the sendevent command. Unfortunately, as far as I've
been able to find, this command isn't very well documented, so we're going to
have to do a bit of work to figure out how to use it. All we get when we run
sendevent --help is this: usage: sendevent DEVICE TYPE CODE VALUE and the
single descriptive line of text stating Sends a Linux input event.
Thankfully sendevent is an open source tool, so we can take a look at the
source code. It appears as though the command is basically just
taking a few parameters, storing them in a struct and writing them to a file.
Not overly helpful in explaining what's going on.
There are a few comments and lines of code that, after some more searching, lead us to the Linux kernel documentation on event codes and documentation on the multi-touch (MT) protocol.
Using this documentation and cross checking values with the output of the
getevent command, we have enough information to emulate a continuous swipe
on the screen. For example, to draw a triangle to the screen, we might do
something like this:
sendevent /dev/input/event1 3 57 23   # EV_ABS  ABS_MT_TRACKING_ID  CONTACT SLOT
sendevent /dev/input/event1 3 53 360  # EV_ABS  ABS_MT_POSITION_X   X POSITION
sendevent /dev/input/event1 3 54 300  # EV_ABS  ABS_MT_POSITION_Y   Y POSITION
sendevent /dev/input/event1 3 48 10   # EV_ABS  ABS_MT_TOUCH_MAJOR  TOUCH DIAMETER
sendevent /dev/input/event1 3 58 10   # EV_ABS  ABS_MT_PRESSURE     PRESSURE
sendevent /dev/input/event1 1 330 1   # EV_KEY  BTN_TOUCH           KEY DOWN
sendevent /dev/input/event1 0 0 0     # EV_SYN  SYN_REPORT

sendevent /dev/input/event1 3 53 580  # EV_ABS  ABS_MT_POSITION_X   X POSITION
sendevent /dev/input/event1 3 54 70   # EV_ABS  ABS_MT_POSITION_Y   Y POSITION
sendevent /dev/input/event1 0 0 0     # EV_SYN  SYN_REPORT

sendevent /dev/input/event1 3 53 140  # EV_ABS  ABS_MT_POSITION_X   X POSITION
sendevent /dev/input/event1 3 54 700  # EV_ABS  ABS_MT_POSITION_Y   Y POSITION
sendevent /dev/input/event1 0 0 0     # EV_SYN  SYN_REPORT

sendevent /dev/input/event1 3 53 360  # EV_ABS  ABS_MT_POSITION_X   X POSITION
sendevent /dev/input/event1 3 54 300  # EV_ABS  ABS_MT_POSITION_Y   Y POSITION
sendevent /dev/input/event1 0 0 0     # EV_SYN  SYN_REPORT

sendevent /dev/input/event1 0 0 0     # EV_SYN  SYN_REPORT
sendevent /dev/input/event1 1 330 0   # EV_KEY  BTN_TOUCH           KEY UP
Playing the Game
Now that we can interact with the device in the correct manner, everything falls into place; we can finally, automatically, play a level:
So we've achieved our goal of automatically completing a level of Wordscapes!
Speeding things up
Yeah, I was a bit disappointed too, I wanted to see some blazingly fast
level completions, but it seems that launching sendevent for each and
every fraction of a packet isn't particularly fast (who'd have thought).
Fortunately, we know exactly what sendevent is doing thanks to our earlier
research. We can just replicate what we found in the source code
and execute it as fast as we like in our own codebase, without having to launch
a separate process each time.
Replicating sendevent boils down to creating this struct and writing it to
/dev/input/event1:
struct input_event {
	struct timeval time;
	__u16 type;
	__u16 code;
	__s32 value;
};
A quick and easy job with the following Python: struct.pack('<QQHHi', 0, 0,
event_type, code, value). Once we've translated our calls from sendevent to
this pack call and written directly the device file, we're done! This is
what we end up with:
That's a speed up of 687% (from 24.4 seconds to 3.1). In fact we can go faster, it's now the device/game that struggles to keep up with processing the input.
I'll leave you with one more level, further into the game, for your enjoyment: